[GUIDE] Army of Beasts (guide to playing as Beastlord)
Beastlord = free 'troops' ... but has risks
Introduction
Elemental: Fallen Enchantress is, broadly, what I call an "open world game." There are many styles of play and, as yet, it is not possible to determine which style is superior to all others -- besides which, there are many interpretations as to what constitutes a superior style of play. For a variety of reasons both strategic and personal, I really like the "Beastlord" route -- choosing Beastlord as a faction trait, which gives your Sovereign a spell/ability called Tame which can convert animals in tactical battles to join your side and fight for you alongside your sovereigns, summoned creatures and trained military units.
The strategic upside to animals is threefold: First, by converting wild animals to fight in place of trained troops, you do not have to invest time in your city build queues to build troops instead of buildings or wonders; secondly, Tamed animals require no Gildar maintenance; thirdly, many animals you can Tame have special abilities (in addition to several having powerful combinations of attack strength, hit points, movement points, initiative and defense strength for regular attacks), such as the Great Wolf's howl which provides an attack bonus to all of your units on the battlefield ... even ranged units, such as archers.
On a personal level, I am a self-confessed tree-hugging wolf lover. I would rather not kill beasts, and get a bit of a perverse pleasure from the idea of crawling over my enemies' warriors with armies of giant spiders, wolves, bears, etc. It is a style I like, and I intend to stick to ... certainly, I have a lot of room for improvement.
I am writing this as my very first attempt at a sandbox game in post-release 1.00. I have played quite a few games back in Beta as Beastlord, and thought I would try to help struggling new players with a guide on this particular playstyle. I hope you find this useful. I intend to go into great detail pointing out what I consider important, explaining my thoughts, and forewarning about risks I take (and as you see, sometimes I fail in those risks).
Setup & Start
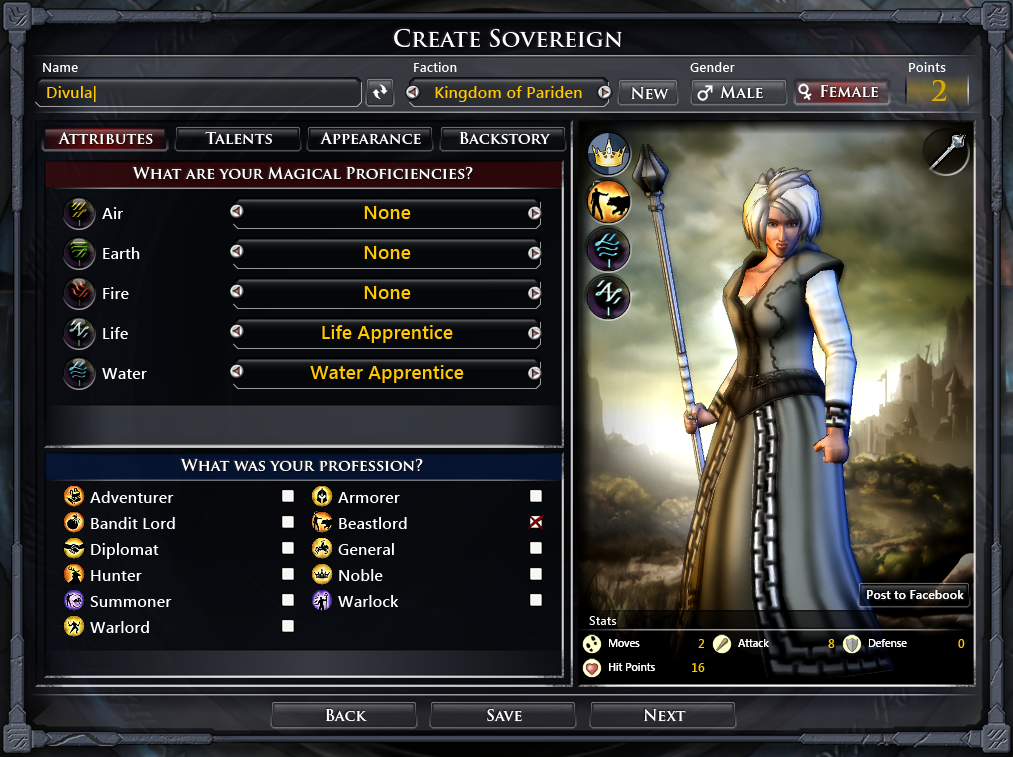
I picked 'Pariden' primarily because of the very useful bonus of +1 Initiative per air shard and +1 Spell Mastery per fire shard. Further, "The Decalon" is an awesome capability for the future -- it enables me to research tomes which will let me purchase tones to grant Air, Earth, Fire and Water magic to any and all champions I recruit (including my own sovereign), not to mention Arcane Monoliths which are Outposts that consume Mana instead of pioneers. I can also build Scrying Pools, which grant +1 essence to its city, and Essence is a very useful resource -- more useful than food, in my book, and perhaps on par with Material (it can be used to improve production, in fact).
I have come to rely on "Beastlord" to develop a powerful military without having to take up time in my city build queues nor gildar maintenance. Its tricky, it takes awhile to master, but it can really pay off and, during the Beta, I became nigh-unstoppable even in higher difficulty games.
I chose 'Life' and 'Water' books for the heal, grink/shrow which are crucial against mega-monsters such as dragons, and Water for its haste/slow which helps in those battles as well as in getting through the 10-round cooldown of Tame in tactical battles. 'Air' and others are useful, of course, but I can get those later on thanks to Decalon.
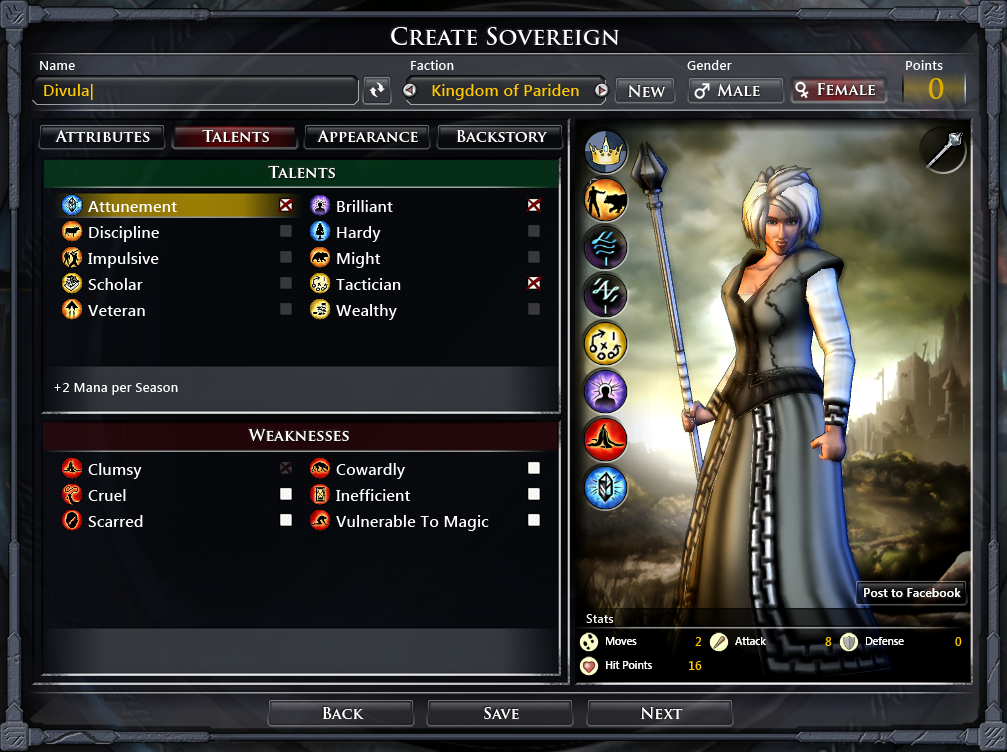
Mana becomes a sore spot because, as of a couple Beta updates ago, the 'Tame' skill now consumes mana at the unholy amount of 40 mana per cast at the outset, so I take 'Attunement' which gives me +2 mana/season to help offset this. 'Brilliant' improves my spell mastery/level, which also really helps to waste fewer Tames (not only does a resisted Tame waste mana, but I cannot recast it on the same target once it is attempted, even if it didn't take -- so if I cast Tame and the beast resists, I have no choice but to kill it, which is a waste to me). Initiative is also important, being able to get more moves and have my turns go faster means a better shop at casting 'Tame' before a monster can do damage (which to me isn't too bad if they get a strike in), so I also want Tactician which gives all units in my Sovereign's stack +1 to initiative -- but to afford all 3, in addition to the two spellbooks, I have to take a Weakness; I choose Clumsy, which occasionally causes attempted melee attacks from my Sovereign to strike the wrong target; I do not intend to use my Sovereign as a tank, but I know especially early on I will occasionally have to use my sovereign for attacks, so I can simply be more careful and, when I can, make the intended enemy target the only unit in a tile adjacent to my Sovereign when attacking which nullifies that weakness.
I picked the 'Spear' for a starting weapon, as unlike all the others except War Staff, it has no Initiative penalty (and, again, Initiative is very important) but also because on occasions when I am not attempting to Tame beasts and actually need to hit something, its 'ignores 50% of the victim's Defense' makes it useful and the immunity to counterattack even more so, so I can get in strikes, have them do some damage even if the victim has a high defense and won't have to worry about counterattacks.
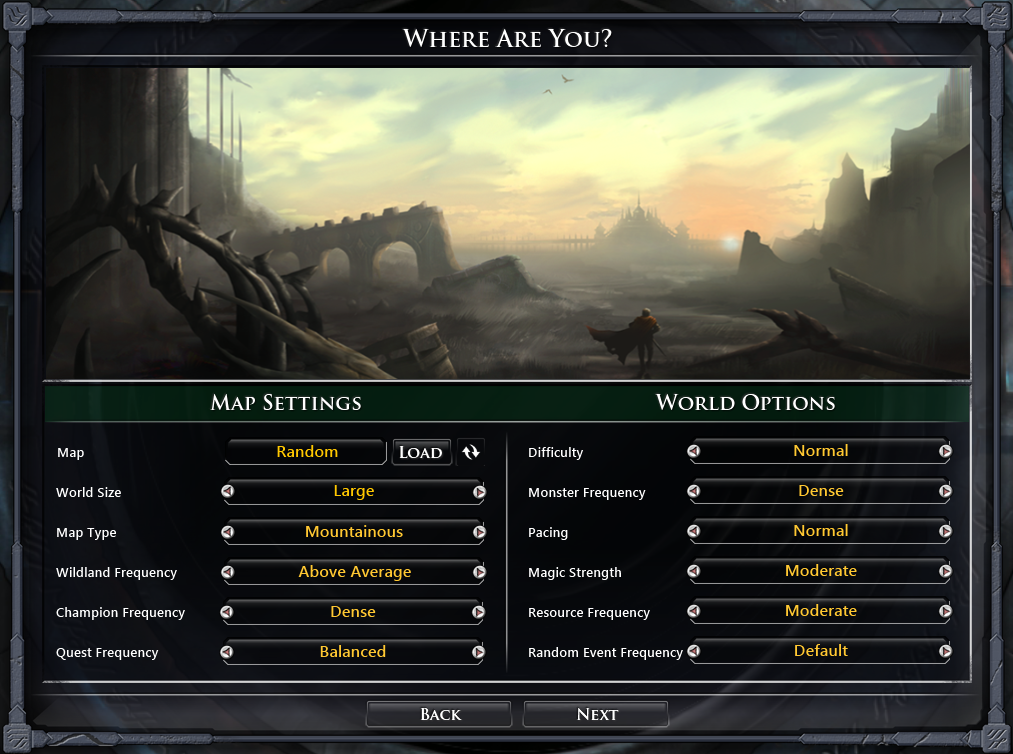
On Map settings, I chose 'Large,' 'Normal' difficult (I was playing on higher levels in Beta, but until I am more used to 1.0, I do not feel too guilty about toning down the difficulty). For Beastlord, 'Monster Frequency' is crucial ... you need more monsters, or you will run out of beasts more quickly. This does mean needing to be careful, but at the same time, the AI will have to face a higher share of monsters and ruffians which will hopefully slow the AI's fast expansion just a tad. I never seem to find very many Champions, so I up their frequency to 'Dense.' I picked 'Mountainous,' as I think I am better than the AI at figuring out strategic advantages, limiting paths of attack on a city by way of blocking terrain.

On enemies setup, I reduced number of opponents to 4 to reduce the problem of AI overexpansion (fewer AI = more space between us = more space for myself), and it also helps boost the valuable Beasts for me to tame since more of the world will be uncolonized and unclaimed longer.
I've gotten sick and tired of the AI "removing themselves" from the world instead of surrendering, as that leaves holes -- once a city is placed, the food/material/mana under it can only be used by that city, and if the city is destroyed either by monsters or razing (all cities get insta-razed when an AI ragequits with 'removing themselves'), the food/material/essence resource under its central city tile are gone forever.

With the game started, our Sovereign starts in a 4 Food/2 Material/0 Essence tile. Blah! No! Food is nearly worthless ... not entirely, but almost. Material and Essence are both much more worthwhile.
Nearby are 6 tiles each 4/2/1, which is better as they each have an essence, and 3 of those 6 are next to Forest so I can build a Logging camp which boosts production-per-material (a frustration myself and other players have is that you are not allowed to 'snake' -- build a string of buildings -- to build a Logging camp along a forest, nor dock along a river; your city must start immediately next to a forest to build a Logging camp and/or next to a river to build a Dock). Unfortunately, there are no special resources in the immediate vicinity -- no shards, no Crystal or Metal, no Clay, no food resources.
The best-material tile is in the woods to the south-southeast -- 2 food, 4 material, no essence. I prefer to have essence, but I cannot ignore it having twice the material of the tiles that do include essence; the 4 material PLUS being in the woods (with woods surrounding it) means I can build a camp there to boost how much production I get from each.

I decide the 2/4/0 tile is the best bet, so I move toward it by way of the treasure, which yields a shield -- useless to my sovereign since I am wielding a two-handed spear, but could be useful for a champion or two I recruit. Heading southeast to settle my first city is a higher priority for me than recruiting the champion to the northwest, as the AI expands very quickly and I don't want to get too far behind, so I need my production up and running. Upon reaching the 2/4 tile, I discover four more nearby 2/4 tiles nearby, but none really have an advantage over the one I picked except for the possibility of leaving more available remaining resource-bearing tiles to build a second city; however, none of the extra northern tiles which would remain have any special value over the one I know would remain even in that first 2/4 spot I chose, and time is wasting to get my production going and my first Pioneer out, so I stick with it.

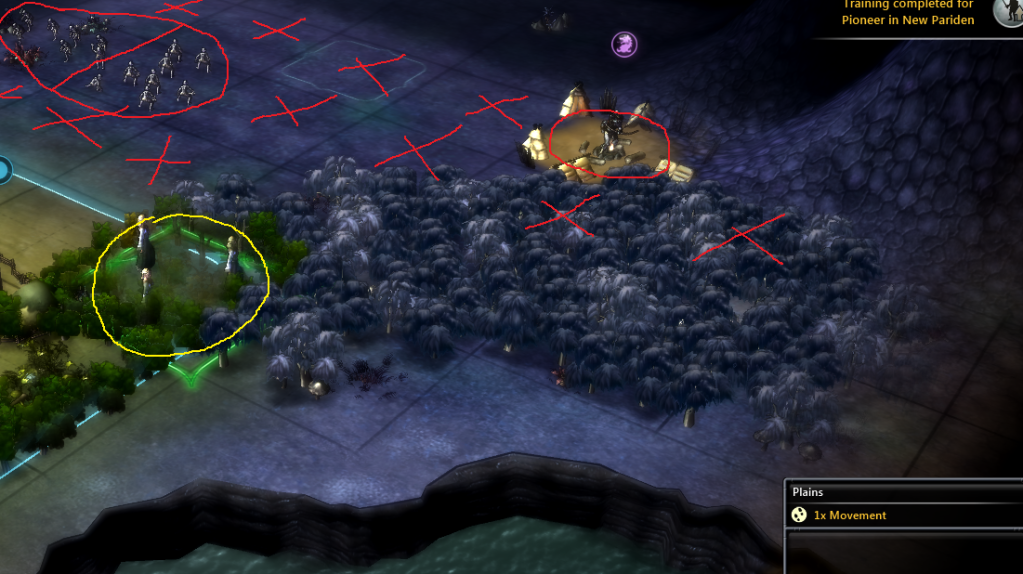
When you settle a city, it blocks all Food/Material/Essence within 6 tiles, as I marked off -- unfortunately Fallen Enchantress being a square tile game, ala Civilization prior to V, it counts tiles in every direction, including diagonal, and not taking Pythagoras into consideration (a one-tile diagonal move on a square grid is roughly one-and-a-half times the length of a one-tile vertical or horizontal move; the FE tile engine does not take this into consideration at any point, not for moving units nor for computing Food/Material/Essence blocks from cities). It can be useful to your gameplay to learn the patterns, how far resources are blocked, etc., as there are situations where you can build more cities if you are careful where you place one city amid an area of settleable tiles.
My initial build order is a Logging Camp, which grants an extra +1 production for each of those four Materials I settled on; this will make everything else build faster. Yeah, there is a little lost time (4 turns) which delays those crucial pioneers, but it will pay off quickly; after the Logging Camp, it is two Pioneers. I add a Scrying pool after the Pioneers, and I want to build a workshop (another +1 production per each of those 4 material) after that -- but I do not have the tech for a Workshop yet, so while my Logging Camp, two Pioneers and Scrying pool are building ...
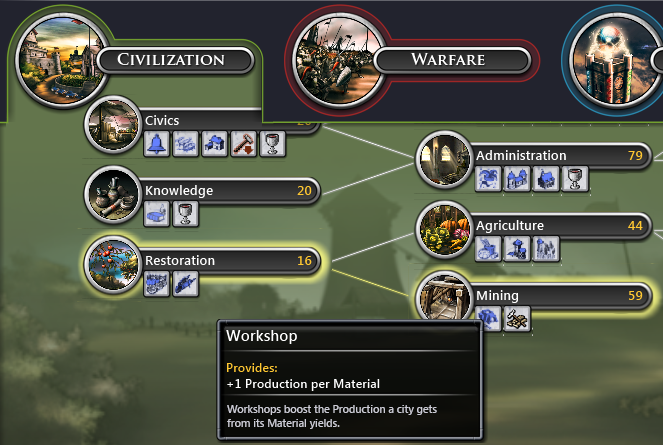
... I can research Restoration, which grants the Workshop, and path up to Mining which gives a 'free' (don't need to build anything to get it) extra +1 Production per each of those 4 Material; that free production boost from Mining will also help my future new cities get going faster on their first production buildings.
I noticed an Abandoned Caravan and a Champion closer to (compared to one I noticed to the Northeast of where I initially started on the map) where I actually settled my Starting City to the east, so I head that way, getting a Rusty Cuirass from that Abandoned Caravan and finding ...
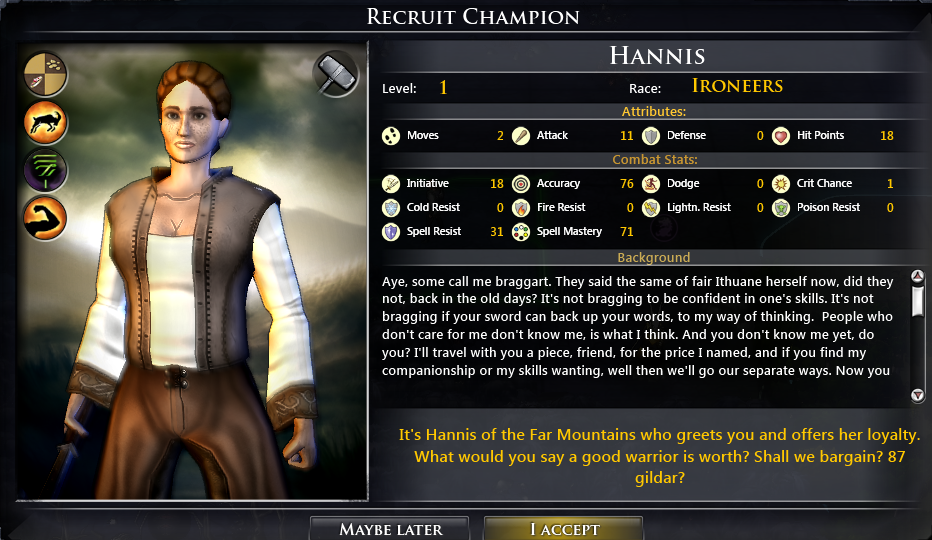
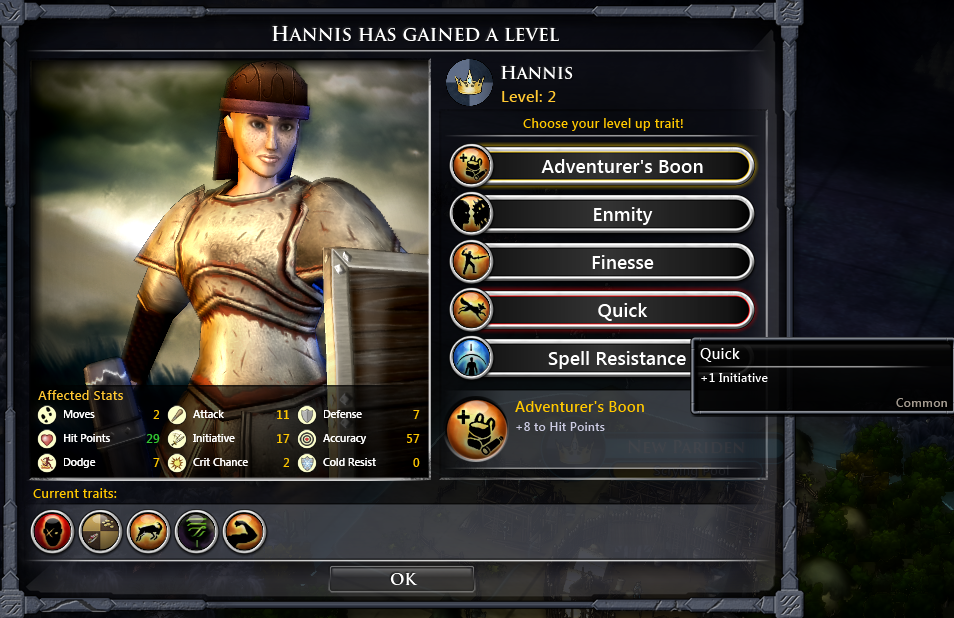
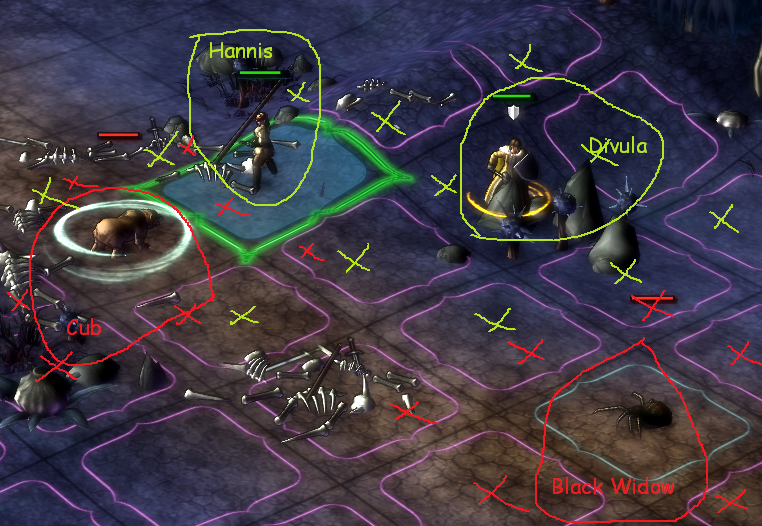
... Hannis the champion, an Earth Mage (which would enable Enchanted Hammers if my city had any Essence, which it won't until it builds the Scrying Pool and most likely, despite my emphasis on production, I will probably use for Mana production with the Meditation enchantment as I need to replenish Mana as quickly as I can to cast Tame as often as I can to get my army of beasts going). Hannis has Strength (+20 Weight Capacity) which means she can carry heavy armor, is an Earth Apprentice which means in addition to Enchanted Hammers (+1 Material to a city), she can cast Aura of Might (All units trained in a city get +1 Defense per Essence in that city) and Nature's Cloak (20% + 10% per Earth Shard resistance to Fire/Lightning/Cold damage), has Bash (can knock enemies prone while attacking) and has Ironeer Blood (which unfortunately makes tactical spells cost 50% more Mana, but grants +30 Spell Resistance and boosts hit points +1 per level). Its good ... but honestly, I am not picky when it comes to Champions; I rarely find more than a couple immediately recruitable, even when I generate a spartan world (large map with fewer AI).
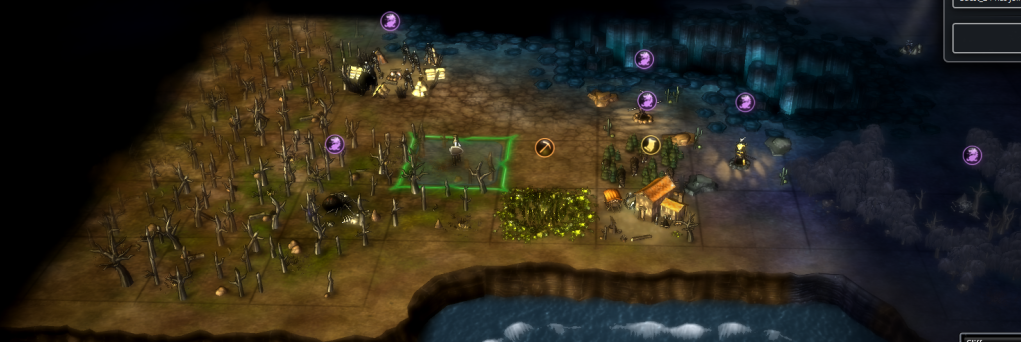
Upon recruiting Hannis, I get to see a bit more of the east of my city -- there's a blocking chasm blocking off this area from the north and an ocean to the south, making it naturally constrained which, to me, is a good thing as it limits where threats can come from to menace my capital.
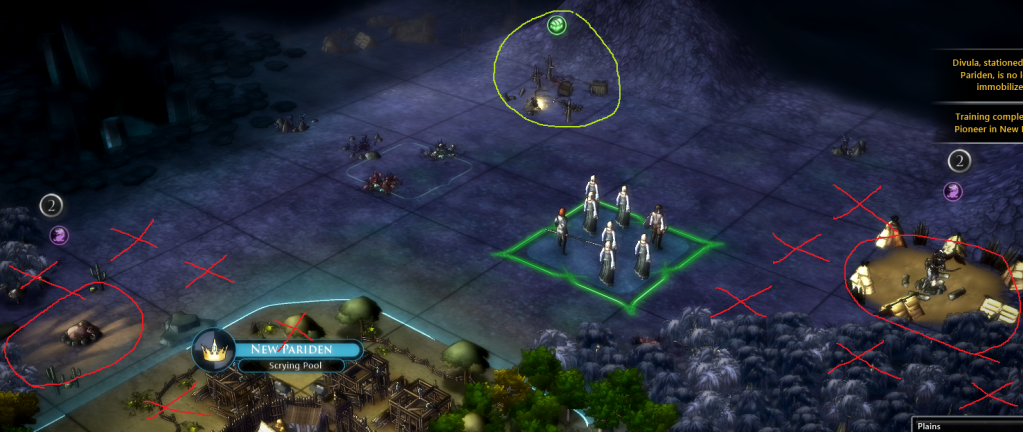
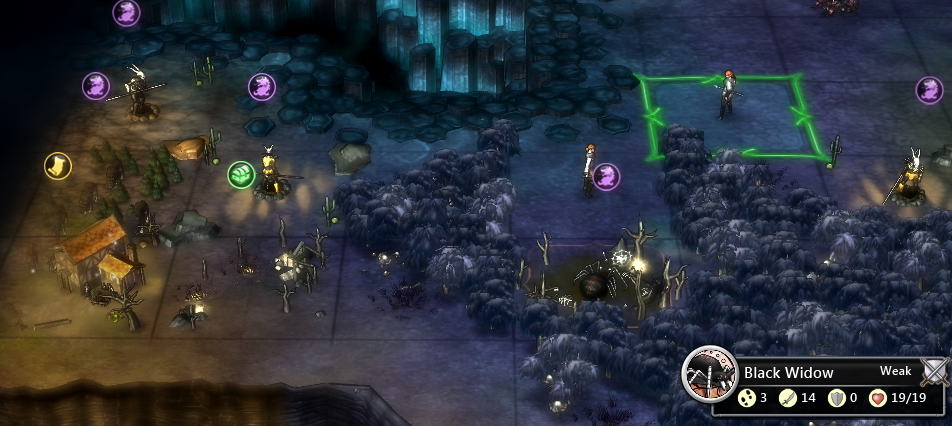
Of note is a treasure, a Weak quest location, and -- very important as a Beast Lord -- a Black Widow immediately south of Hannis. Web-casting spiders are my first priority to Tame, as their Webs make subsequent Tames much easier ... in what seems to me to be an AI glitch, an enemy AI on the battlefield will never use an ability nor cast a spell while Webbed in tactical combat (not even ranged spells like Web itself), and web also helps to hold a beast still which is generally very useful, but even more useful when you intend to Tame several beasts in tactical combat, as Tame has a 10 turn cooldown during which it is best to not fight the beast you want to Tame (you certainly don't want your guys killed, and you don't want to kill a beast you want to Tame).
Hannis comes armed with a Battle Hammer, which is one-handed, so I trade the Wooden Shield to her which grants a constant +2 defense, an extra +5 defense while defending (essentially a defense bonus if she skips a turn; she can move and skip, but not attack nor use any spells nor abilities to get 'Defending') and +2 to dodge as well (always good to be able to not get hit! :P). I leave the Rusty Cuirass with my Sov for now ... eventually I will find something better, like a cloak that boosts Spell Mastery even if it has lower defense, but for now she's on her own. This early on, at Level 1, attempting to Tame that Black Widow is a greater risk, as there's a danger it might resist in which case its a game of Melee and even if not, may get a strike first, so I will need the Defense for now.
I send Hannis toward that treasure on the coastline and move my Sovereign in to Tame that Beast. I do want to return North to see about recruiting that other Champion, but after recruiting, I have a Gildar deficit and only 63 gildar to spare ... I am not in any real danger of going bankrupt, as the deficit is only 0.2 gildar/turn, but I may not have enough remaining Gildar banked to recruit a second champion.
The treasure turns out to be a Leather Helm (+1 to Defense), which I immediately equip on Hannis. Moving Hannis there also reveals a Wild Grain resource one tile east of that weak Inn quest location, and so I continue moving Hannis toward it to see if there are any settleable tiles closeby; I find none. It is a bit far to snake from my city (you can snake to resources to protect them with your city limits, so they can't just get insta-destroyed by a monster walking over them without having to face your city defenders) though not impossibly so -- it is a tedious effort though, as I can't simply queue buildings to snake; it will not let me place a building in the queue at a specific place on the map except immediately next to an already-completed building.
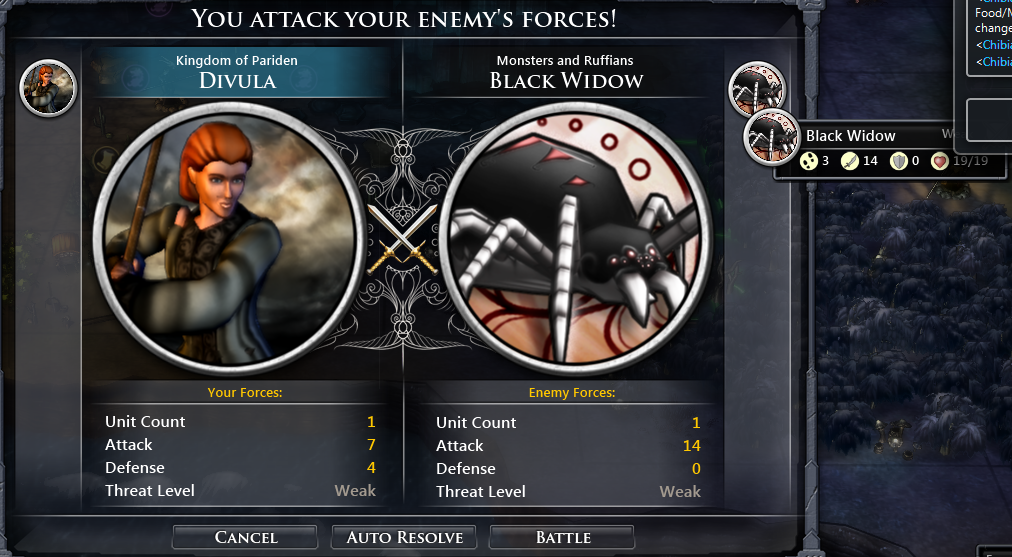
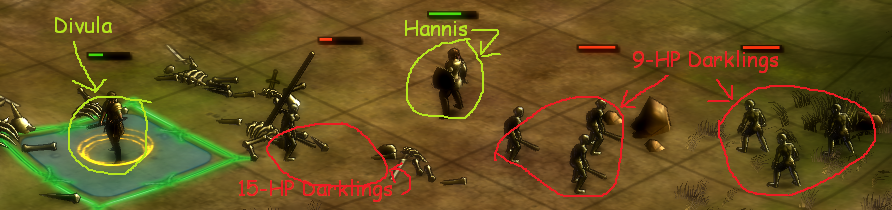
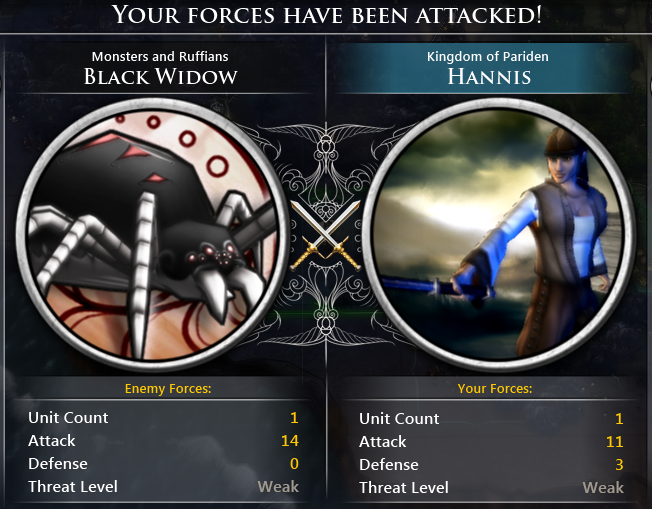
Meanwhile, Divula my Sovereign engages the Black Widow in a dance. Especially this early on, this can be quite dangerous -- with an attack of 14 and 19 hit points (by comparison, Divula has only 7 attack and 16 hit points), the Black Widow is not to be trifled with. The Black Widow has zero defense (which thanks to the Cuirass, Divula at least has 4 Defense -- but part of the Widow's attack is poison, which ignores armor and gets extra damage in every round for my own Sovereign), so the Ignore 50% Defense feature of my spear is rather wasted if the Tame fails and I have to spar the Black Widow to death.
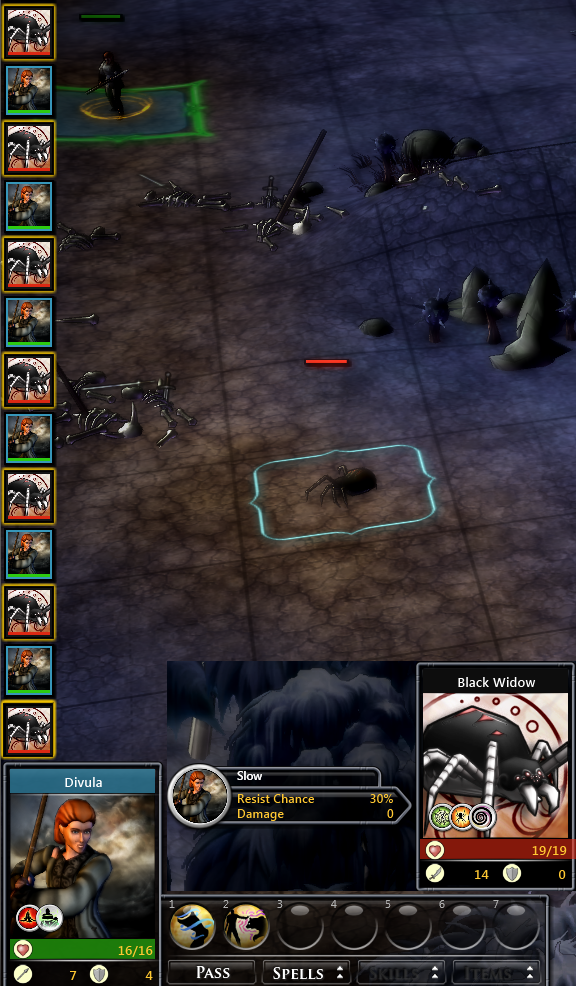
I tap the 'Slow' spell to gauge the Black Widow's spell resistance -- close to what I expected, 30% chance of resistance against my inexperienced Sovereign. To those bad at statistics and inexperienced at games that give you % chances, that seems pretty good -- a 30% chance of failure means a 70% chance of success -- but for those of us with a bit more experience, the 1 in 3 chance of failure for something we are relying on is a high risk of failure. Later on, my odds will improve after Duvala levels up (just as a baseline given the Spell Mastery per Level bonus I get, but more especially if I get Spell Mastery equipment such as a robe, or a Spell Mastery promotion) potentially to as low as 3% chance of resistance from most enemies (one of the last Beta Updates eliminated the possibility of lowering the chance of Spell Resistance, Dodging regular attacks, etc. to 0% and 3% -- roughly 1-in-33 -- is the hard-coded minimum).
The only good way I have found to gauge relative Initiative is a glance at the unit order, the column of unit icons on the far left of the screen which indicate who gets to take their turn when. Between the Black Widow and myself, we are pretty even -- its pure 1:1 alternation for the foreseeable future. I cannot reach the Black Widow my first turn, so she will get to move -- but given my Water spell capability, I do have 'Slow' I can cast to favor myself at the cost of only 5 mana which I can more readily risk failing from Resistance; if the spell succeeds, it offers an advantage to me in that I will get to take two tactical turns on occasion in between the Black Widow's turns ... in the unfortunate possibility that my attempt to cast Tame on the spider fails, this will help me survive the battle.
I move as far as I can toward the spider, then successfully cast Slow, and now I will get two take two turns in a row after 3 one-to-one rounds with the Black Widow. The Black Widow attempts to cast Web on me, but I resist. Back to my turn, I move toward the spider again but wind up a tile short of being able to attempt to cast Tame, so the Black Widow will get an attack in on me next round.
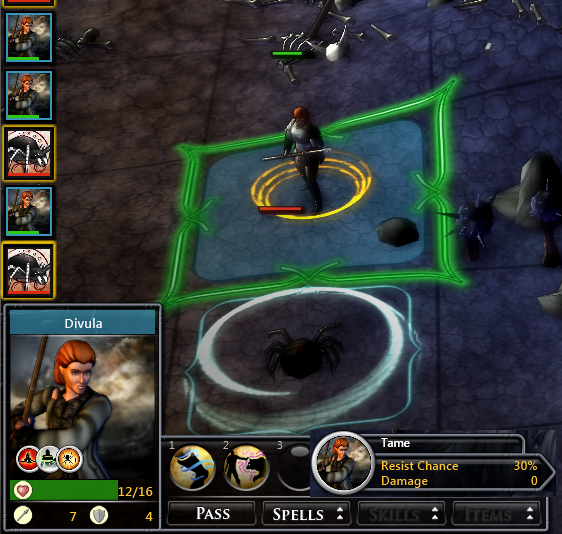
The Black Widow does, indeed, move and attack (it does have a cooldown so cannot cast Web again, which it would tend to do if it could rather than move and attack), doing 4 points of damage and poisoning Divula. Now I can attempt to cast Tame on the Black Widow. I mouse over the spider WITHOUT Tame selected to see what I may be facing if Tame fails -- a regular attack from me has a 76% chance to hit the Black Widow, but only 3-7 damage if it does hit against the Black Widow's 19 hit points. I am still two rounds away from getting a double round, and it is four more rounds after that before I get another double-round ... no getting around it, without heal, there's a good chance my Sovereign will fall if Tame fails.
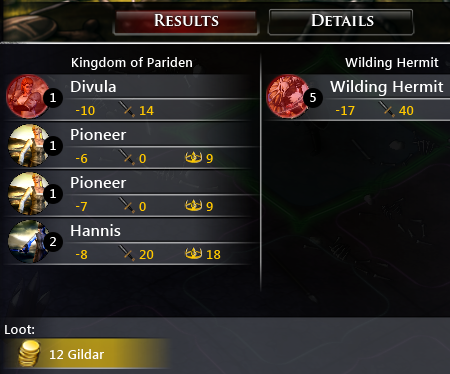
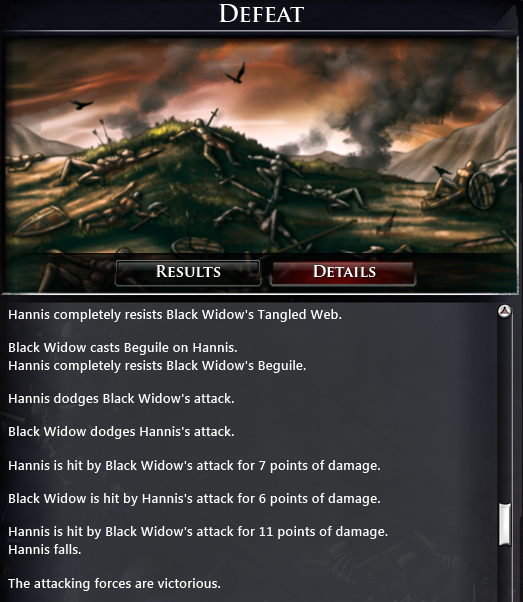
Unfortunately, spending 40 Mana on the attempt, Tame does indeed get resisted (I cannot iterate enough how high a 30% risk of failure is to those of you bad at statistics!), and the Black Widow whomps me with 9 damage, bringing me down to 3 hit points -- so low, I will likely fall just from the ongoing poison damage.
I manage to hit the spider for 6 points of damage, and its poison does only 1 point of damage (taking Divula down to 2), but the spider gets another attack before my first double-round and, unfortunately, the blow hits fatally for 6 points of damage. Divula falls.
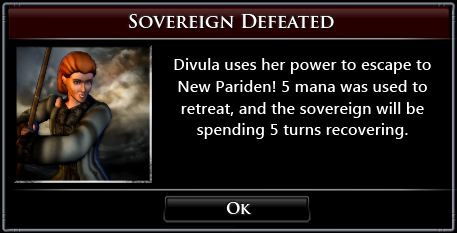
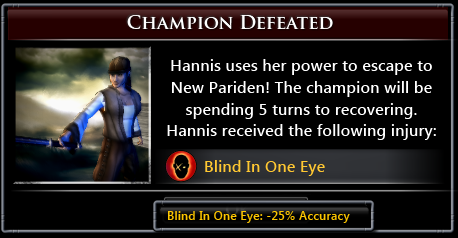
Fortunately, so long as I have a city, I can survive falling in combat -- but it costs Mana and my sovereign (and any champions in the combat with them who also fall) are out of action for several turns (5 turns in this case). Sovereigns, fortunately, do not incur injuries (unlike all other champions) in combat.
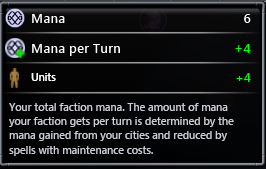
I spent 5 mana casting Slow, 40 mana on the failed Tame, and lost 5 more mana 'using her power to escape to' the capital from falling in combat, bringing the cost of that failed Tame attempt to 50 Mana. This leaves me with a mere 6 Mana total, with my Units generating +4 mana/turn ... this means it will be (40 - 6 = 34 / 4 = 8 1/2 ~=) 9 turns before I have the 40 mana saved up to try another Tame, and more than that to try to protect myself with another Slow.
This leaves Hannis to explore while my Sovereign recovers; I send her farther East to peak past the Grain, but still no Food/Material/Essence resources for a second city. I decide to send her North to check out that other champion, find more treasure, and take a slight detour -- given I have to circumnavigate the chasm anyway -- to the Capital to take my recovereign Sovereign's armor in the process.
While it might seem that I should have use Hannis in my failed attempt to Tame the Black Widow, as a backup in case of Tame resistance (which is what happened), I decided against this for several reasons:
- Failing to Tame but winning the fight would not have saved much -- I would still be out 45 mana (yes, 5 less if my Sovereign did not need to spend 5 mana to escape, but that's minor compared to the 45 Mana I would have spent regardless)
- There is no guarantee Divula and Hannis would have won the fight together in the event Divula failed (as she did) casting Tame on the Black Widow. This means I was not just risking having to spend that extra 5 Mana, but if Hannis was along for the fight and she fell, too, she would have incurred a potentially crippling injury for the remainder of the game (unless I found one of those rare potions to restore injuries)
- Killing the Black Widow in the event Tame failed is actually not that great of an outcome. With the Black Widow having survived my failed Tame and having survived the fight, it is available to try again in another attempt (in another tactical battle -- within the same tactical battle, you can only attempt to Tame a particular animal twice; you can attempt to Tame a second animal after a 10 tactical turn cooldown, but not re-cast Tame on an animal who successfully resisted Tame already)
- I do need to find an adequate site to settle a second city, and even if Hannis successfully helped defeat the Black Widow following the failed Tame, that would come at the expense of several turns of exploration.
Based on those four points, weighing risks versus benefits, I did consider bringing Hannis along for the battle as not being worth it. Hannis is alive to continue exploring while my Sovereign recovers, and the Black Widow survived so I can attempt Tame again after my Sovereign recovers.
Anyhow ... phew, trying to paste images and draft text together in a post is a bit more work and time-consuming than I had anticipated, so I will take a break at this point. When I continue, after posting a forum post composition gripe, I will reply to this post to keep it in one thread.

 Psst, that's a secret tip, don't go telling everyone!